Garage Makeover (Almost)

I am close to being done with the garage makeover, but as I ponder how I am going to scale the top of my house to paint the eaves I am going to get to the rest of the exterior that I can reach.  However, I have finished (hopeful thinking as it may need another coat) painting the garage door.  Let me remind you of the before and then take a look at the after.


 Hubby likes the basketball hoop, so it is staying.  However, once I am done with all of the painting I think that light fixture is going to have to be replaced.  This one from Lowe's is what we have on the front of the house, and I am thinking about adding it back here too.


Garage Make Over

Finally it has cooled down enough here in the south for me to get excited for Fall.  (No!  This picture is not from this year, it was taken last year during a very unexpected snow storm).  Fall is definitely my favorite time of the year, you get to look forward to the holidays, fires, sweaters and apple cider.  It also means that I can begin touching up the paint on the outside of the house.  I learned my lesson back a couple years ago when we moved into our house and I decided to paint the front door during the hot summer seasons.  Lets just say that you should follow the directions on the paint can, they usually DO know best ;)

Our home is mostly all brick with just trim to accent with paint, but we do also have eaves on the each side of our home as well as siding in the back where the deck is.  The house is set pretty far back from the street, and when we moved in everything was painted green with lots of green landscaping.  I painted the columns and the front door & shutters so that they would pop from the street. 


However, we never have gotten around to the rest of the exterior since there was so much to do on the interior (and still is).  With that being said, the paint has decided that it has had enough and is peeling off.  So all other projects are on hold right now and gradually I am painting the exterior, starting with the back alley.  


Again it started out all green and boring.  The home from the front is very traditional and so I decided that it would look nice to keep continuity around to the back of the house.  The garage is going black to bring in the accent color from the front door and shutters, while the trim is going a nice shade called Swiss Coffee.  The siding is going to be a left over can from the garage Happy Valley.  


I am at the part of the project that I always get scared which is the first coat of black.  I am just trying to remember my vision in my head and press on.  

Off to finish the second coat, hopefully this is the last coat.  Fingers crossed!!!

Photobucket

Spec Turned Spectacular


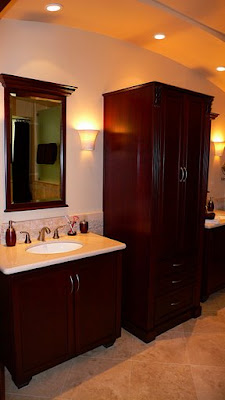
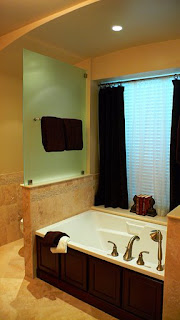
We've all seen them, the spec home that looks the same as every other house on the block.  You enter the front doors to see one of three options for tile and one of three options for carpet. Just to enter the bathroom to see one of the three choices for cabinet colors and doors with builder grade tub and large mirror glued above the sink. (By the way I would love to have a spec home bathroom right now instead of my dated '80s one with shell pedestal sink).  Check out this spec home bathroom that I got the privilege of gutting.   


I just L O V E when I get a client who has the budget to run with (don't get me wrong there is something fun with the thrifty finds game too), but I rarely get to have a vision and not have to modify it due to budget.  Everything is this bathroom was gutted.  There is no sight of a spec home bathroom here!  Architectural character was added by removing the linen closet and partition walls for arches on both sides of the room.


Photobucket


A Layer of Character

Janell over at Isabella & Max Rooms has inspired me to find a way to use stencils in my home. She has done such a great job of bringing stencils into her home in a modern way that just helps bring some character and personality into a space. It is easy to have too much going on in a home and it starts to look cluttered, and the way that she incorporates these throughout her home just adds a feeling of texture.

I have been just standing back and thinking about where I could incorporate this into some prominent space. Then I realized that it could give my entry wall some definition since it really only has one wall, and that wall is shared with the Living Room. Now my only decision is do I use a darker color for the stencil or a lighter? I am leaning towards the lighter, but I don't want it to look to feminine and I think that the contrast of a darker color will keep it from looking to much like lace (see this is why it is so hard to decorate your own home).


Photobucket

Function in a Kitchen

Many people think that if your kitchens layout isn't functioning properly that you need to replace the cabinets (COSTLY), this just isn't the case. If the existing cabinets are in good shape and are prime for retro fitting then getting a little bit of the creative juices flowing you can manipulate an outdated kitchen for the modern family.

Before

Before
YIKES! That dishwasher doesn't even open without throwing your body weight against the oven door (example of how NOT to retro fit existing cabinets).

After

The dishwasher stayed in its original location, but the oven got moved to the cooking station closer to the cooktop. A cabinet maker constructed a panel to fit a gap below the new microwave to hide the opening from the old oven.

Before

AfterNow the oven and cooktop are next to each other. Also, the cooktop is an induction cooktop that stays cool to the touch, perfect for on an island where children will be sitting across from it. Note the posts and skirt that frame in the oven as a more elegant way to dress up the empty space from the original cabinet.


Photobucket


Dining Room in Transition


As with many homeowners your home is always a work in progress. Mine is nothing different, in fact I wonder if I would ever feel finished even if I were to have a million dollars and do everything I wanted to at once. I feel like such an adult, I can now have more people around my dining table without bringing in the camping chairs or patio furniture. Below is a photo taken a couple days after we moved in. Shockingly this was not the worst room in the house, you should have seen the bathrooms! Our home had been a rental for a few years and so most of the fixtures hadn't been update and mini-blinds, YUCK, adorned every window in the house.

Before

Below is a picture from last winter when I finally upgraded the dining table to a longer one that I could fit six, gasp, people around at dinner. Only problem was that I only had four dining chairs. And so the problem loomed until last week when I finally got two more dining chairs. I have been sick all weekend otherwise I would have had a dinner party just to break in the new chairs. The only thing that has stayed untouched in the original room is the four chairs (and those will eventually get touched). The biggest party for me came when the mini-blinds came down and the natural woven shades went up. The walls getting painted were a close second, and I mean a CLOSE second.

Tansitioning


Okay, so for a game of I spy can you tell the changes other than the two gorgeous, wonderful, couldn't be better chairs from the transitioning photo and the after photo?

After


Okay, I give you a hint. I painted the store bought cabinet black and painted to back panel of it blue/gray to coordinate with the drapes (they have a woven thread of blue, gray and green in circles throughout). I also took the glass off of the light fixture and replaced it with a drum shade. I think this really softens the look and gives off more light. Like I said before, it is always a work in progress. However, this work in progress is much improved if I do say so ;)

Photobucket
Related Posts Plugin for WordPress, Blogger...