Showing posts with label Before and After. Show all posts

Mirror mirror on the wall, you're the fairest of them all!

Well, I got the mirror finished, and I am going to go ahead and put it out there that I LOVE IT!

When I started out, I really didn't know where I was going with it {not a good plan}. I did however know what colors I wanted to incorporate. However, after the stool debacle I was a little hesitant to jump off of the neutral train. Forging ahead the mirror first got some more life with the same green paint that was used on my coffee table tray. That's a pop of color for you!


The room has a more rustic look so I watered down the grey used on the stencil walled entry and formed a glaze. This glaze was rubbed all over the mirror.


Some stain is then applied to the detailing in order to give the piece some more depth. And there you have it!


Sometimes it's just a free simple change that makes a room fresh!  I am still thinking that I want to do something more with those plates, but I'm not sure yet.


Photobucket

Musical Wall Art

Ugh, we still haven't figured out the computer thing! Apparently it is pretty common with Dell's around this age, so we have a checklist of things we need to do in order to get it up and operating properly. However, it was the weekend and I took the opportunity to use the hub's computer to upload my pictures for the week:)

Remember way back when I wanted to find some thrift owls to makeover? Well, I didn't find any, but I found some cute plates that I knew I could do something with! Originally I thought they would go in the kitchen, but it was too crowded. So I decided to put them on this wall that I've been struggling with for awhile.


Here is a map of where I wanted to place everything. {I strongly urge you to do this if you don't want tons of holes in your walls}!


This is how it looks with everything hung up. That mirror is contrasting too much, and the room is too brown and black. I think I am going to makeover that mirror to give the room more color. Maybe do something with those plates too!


Eventually I would like to swag the light fixture to be centered on that short wall, and add a buffet. When I figure out how to plant a money tree I'll get all of my wish list completed ;)


Stay tuned for how I transform the mirror, and hopefully it won't be as much of a mess as the stool.


Photobucket

I'm just not that in to you...

 I've had this stool for many years, and as you can tell it has been used as a paint stool quite a few times.  


Inspired by the colors and pattern of this Union Jack Rug the stool began a transformation...

it felt too busy and contrasted the wood more than I liked, but I wanted to give it a weathered look anyway

I don't know, not feelin' this one so much.  I actually preferred the pre-distressed look better.


I tried hiding moving it into the mud room


and...I'm just not that into you!  I am tired of fiddling with it, I'm thinking I might just go with a solid color and call her good.  Input, suggestions advice are all much appreciated at this point!

Photobucket

In Case You Were Wondering...

 This is what I was up to this weekend.  Some of you guessed it, and I really confused others of you, but I was fixing up a Goodwill tray.  Last week I dropped off some stuff at Goodwill, and you know I couldn't pass up going inside and seeing what they had!  Here is my $2 purchase...


Mini Tutorial:

 1.  Prep work - sand, clean, prime and base coat 2. tape off area for accent color  
3. touch up  4. clear glaze coating  5. wait proper dry time (I forgot this last step, and had to go back to start)


I really wanted to add some more color into this room, but mainly I needed a home for my coasters besides in a drawer now that they look so darn pretty!  I think the tray really adds a pop of color and ties in well with the tin art we have on our mantel. 


 For those of you wondering if we had a living room... we do!  I'm sorry I have never posted pictures of this room before, but I couldn't figure out a good way of photographing it without showing you all of the padding around our hearth ;)  Our fireplace is monstrous, and trying to photograph around it is no easy task.  So in light of keeping it real I choose little mans noggin over pretty pictures.


Photobucket 
{join the party}
MakingThe Girl Creative Keeping It Simple

Make it Yours @ My Backyard Eden

CreativeShareWednesdays   


monogram


Kitchen Chalkboard Wall


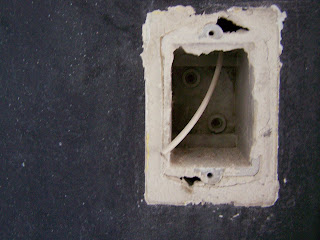
I'll be the first to admit that sometimes I just want to get a project started, and tell myself "I'll come back and touch that up later".  That was the case with this U.G.L.Y. you ain't got no alibi ugly telephone jack that is disrupting my chalkboard wall.  The initial thought was that we could put a phone there, however our home is a 60's ranch and has no electric to plug a modern phone into {we don't even have a land line}. Instead I decided for some unknown reason to "disguise" it... um, not so much!

I wish I had know how easy this would be to remove YEARS ago!  Apparently telephone wires can be cut and shoved into the wall.   

Yikes, this was honestly the scariest part for me, I have always been told never under any circumstance cut wire without turning off the electric.  I left the plastic housing in the wall because honestly it looked like it had become one with the wall.
 
Then a little patch work with the help of a mesh and metal wall repair kit and some spackle.  The tricky part was sanding it to the same texture as the rest of the wall.  A couple coats of chalkboard paint and your done.  With the confidence I have gained doing this little project, I am thinking I can tackle taking out the outdated intercom system.  I mean really in a ranch style home do you really need those monstrosities? 


Photobucket

Honey and the Moon {Guest Post}

Yesterday my wonderful father-in-law and brother-in-law drove 900+ miles to help us repair our fence in the backyard.  Therefore I figured we better assist in helping and have the wonderful Carly from the blog Honey and the Moon guest posting.  If you aren't familiar with her blog, she is doing a master bedroom makeover and is taking us step by step through that journey.  It is a wonderful blog, and she is an amazing person.  I hope you'll take a moment to read about a project she's just completed as well as stop by her blog.  Enjoy!
__________________________________________________________________________

Hi y'all, I'm Carly! I blog over at Honey and the Moon and I am so happy to be here guest posting for the fabulous Kendra today.


I just recently met Kendra through some mutual blogs that we both read. We quickly found out that we're both Texas girls {me being native, her being a "transplant"} and that we actually live pretty close to each other. Kendra is as sweet as she seems on her blog and since we're both on non-existent house budgets, I love seeing how she keeps her projects affordable.

I'm currently a full-time student, a wife, and a momma to two sweet puppies. My husband and I live about 30 minutes from Dallas and 30 minutes from Ft. Worth, it really is a great place to be. I love coffee, organizing, and doing things in the cheapest thriftiest way possible...which brings me to the project that I'll be telling you about today. 

Before I get to the project details, you should probably see my master bedroom inspiration photo first:


You see those little knick-knacks on the side table? I wanted something similar, but I wasn't interesting in spending too much money on anything. Naturally, I started looking for things in my home that I could give a good coat of spray paint and put at my bedside. 

My mother-in-law gave me these little Christmas red birds this year when she was getting rid of some extra Christmas decor, and I thought they'd be just perfect with a coat of paint.


So I bought a can of paint, in my favorite brand...

Seriously, I swear by this brand.

Gave the birds a coat of paint...


And totally ignored that whole rule about waiting enough time in-between coats...


I guess I never learned that I should just follow directions the first time, so I had to do a little bit of light sanding to fix some of the imperfections. I just used a 180 fine grit sandpaper, being really careful not to take too much paint off.

I gave the birds another coat of the metallic paint, and {maybe} waited the suggested amount of time before whipping this stuff out for a finishing coat. Kendra recommended it to me after using it on a project, and I really loved it. It gave everything a very finished look.

 Warning: this stuff smells STRONG. I'd definitely recommend doing it outside if possible

My last step was to find a place for my birds. I knew that one was going by my bedside, but wasn't all too sure if the other would go on my hubby's side or not. In his words..."he doesn't like a lot of 'junk' on his nightstand." So, I'm still trying to find a place for my other little guy.

On my nightstand
Sorry about the poor lighting. Still gotta achieve that 2011 goal of figuring this camera out. 

Project Cost Breakdown:
Krylon Metallic Silver spray paint - $3.75
Krylon Clear Gloss spray paint - $3.75
180 grit sandpaper - $2.50 {I bought extra for a future project}
Ceramic birds - free
Total: $10.00


Overall, I'm really happy with the way that they turned out. The spray paint didn't give quite the metallic look that I was hoping for, but I'd read that from several other bloggers as well. Maybe I'll change them someday {I've thought about trying to silver leaf them}, but for now I'm really satisfied. I'm always so amazed at what a huge change a can of spray paint can make.  

Thank you for reading and thanks again to Kendra for letting me guest blog over here today! I hope all of you stop by my blog sometime and say hi...I'd love to meet you.


Love to all. x


Photobucket
Related Posts Plugin for WordPress, Blogger...