My Productive Weekend

We worked on the side yard all day Saturday and part of Sunday, and would you believe me if I told you it looks like we did absolutely nothing?! We set the posts for the fence that will be towards the front of the house and built all of the fence panels and gate. However, because the posts have to set in the concrete we weren't able to get the panels onto the posts this weekend. Hopefully they'll be able to just be placed up quickly next weekend and we can work on the fence at the back of the house :)

While we wait for concrete to dry (and any other down time that I have) I was browsing Houzz. I got their app last month, and I am WAY more addicted than I was before! While browsing around I came across this family room that I haven't taken my eyes off this whole week.

Isn't it so warm and inviting?! I puffy heart LOVE those built-ins! After staring at this picture for hours I decided to see who designed this room (Elizabeth Gordon), and found so many more gorgeous spaces from the same Hollywood Hills home. 

Would you believe it that this is Joel McHale's (The Soup & Community) home? Of course it is, as if he wasn't dreamy enough already!  Apparently I have been living under a rock because it was featured in In Style Magazine, so maybe you would believe me ;).


Photobucket

Weekend Spruce Up - Garden

While the rest of the country is buried under snow, we're jumping into spring with temperatures in the upper 60's to low 70's.  What this means for my weekend is that I can start back up my exterior house painting and work on preparing for our spring garden.  You may remember that I got the back of the house done before Thanksgiving, and since then it has been at a stand still. 

Our yard is divided into three sections.  The front yard, the backyard and the side yard.  This is because our garage is located and the back of the house, and technically breaks up our backyard space.  The side yard has been neglected for the entire three years that we have been in the house.  
 {this area will be the vegetable garden}
{future outdoor living or dining}

I told you it was neglected!  Excluding that fire pit, we don't even have chairs to sit and enjoy it :)  This weekend we will be starting the old but new to this side of the house fencing project.  The goal is to divide this space into a vegetable garden at the back and an outdoor living space to the front which happens to be just outside our kitchen.   Be prepared to hear about this project for a.very.long.time as we don't really know anything about gardening or landscaping, so if you have any tips or advice we'd love to hear them!

I don't want to keep your eyes burning with that ugliness, so let me leave you with some photos that I hope my garden will someday resemble!
modern landscape design by san francisco landscape architect Shades Of Green Landscape Architecture
Wouldn't these be a great way to do the tomatoes and pepper plants!


Photobucket

Oops I did it again...Card art take two

I played with your heart...  (you'll be singing that all day now ;)

I have never been one for decorating for Valentine's Day, in fact the day itself isn't that big of a deal to me.  My mom however is a HUGE holiday decorator, and sends me some sort of small gift every year.  Those LIVE LOVE LAUGH mini vases were a Valentine's gift from her last year, and these beaded heart coasters came from her as well (still trying to decide what to do with those, stay tuned).  When my sweet hubby brought me some hot pink roses this weekend I decided that they needed the company of some hot pink Valentines Decor.  So stealing a page out of my Christmas Card Art I took a cute Valentine's card that I had given to the Mr. a few years back and framed it. 


 (because I care what people think, cheesy candle or no candle?)

 (why do I point things out?  please excuse the toys in the baskets, I am usually better about hiding them from view!)

Pink is not a color I have ever decorated with, but I love the fun pop of color that this adds to our home!


Photobucket

In Case You Were Wondering...

 This is what I was up to this weekend.  Some of you guessed it, and I really confused others of you, but I was fixing up a Goodwill tray.  Last week I dropped off some stuff at Goodwill, and you know I couldn't pass up going inside and seeing what they had!  Here is my $2 purchase...


Mini Tutorial:

 1.  Prep work - sand, clean, prime and base coat 2. tape off area for accent color  
3. touch up  4. clear glaze coating  5. wait proper dry time (I forgot this last step, and had to go back to start)


I really wanted to add some more color into this room, but mainly I needed a home for my coasters besides in a drawer now that they look so darn pretty!  I think the tray really adds a pop of color and ties in well with the tin art we have on our mantel. 


 For those of you wondering if we had a living room... we do!  I'm sorry I have never posted pictures of this room before, but I couldn't figure out a good way of photographing it without showing you all of the padding around our hearth ;)  Our fireplace is monstrous, and trying to photograph around it is no easy task.  So in light of keeping it real I choose little mans noggin over pretty pictures.


Photobucket 
{join the party}
MakingThe Girl Creative Keeping It Simple

Make it Yours @ My Backyard Eden

CreativeShareWednesdays   


monogram


Weekend Inspiration

Woo, this week has flown by!  I can't believe it is Thursday already, and I am still working on the same project I started at the beginning of the week.  A coffee maker and iron had to be taken to Goodwill, and you know I couldn't leave there without stopping in to see if there was anything I couldn't live without.  Lone behold, I found something!!  Each of these photos inspired the transformation of my secret {sounds more exciting that it really is} project.


Do you spy the common denominator in all of the fabulous rooms?  


Photobucket

Kitchen Chalkboard Wall


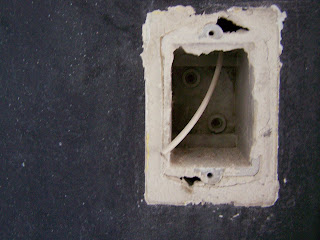
I'll be the first to admit that sometimes I just want to get a project started, and tell myself "I'll come back and touch that up later".  That was the case with this U.G.L.Y. you ain't got no alibi ugly telephone jack that is disrupting my chalkboard wall.  The initial thought was that we could put a phone there, however our home is a 60's ranch and has no electric to plug a modern phone into {we don't even have a land line}. Instead I decided for some unknown reason to "disguise" it... um, not so much!

I wish I had know how easy this would be to remove YEARS ago!  Apparently telephone wires can be cut and shoved into the wall.   

Yikes, this was honestly the scariest part for me, I have always been told never under any circumstance cut wire without turning off the electric.  I left the plastic housing in the wall because honestly it looked like it had become one with the wall.
 
Then a little patch work with the help of a mesh and metal wall repair kit and some spackle.  The tricky part was sanding it to the same texture as the rest of the wall.  A couple coats of chalkboard paint and your done.  With the confidence I have gained doing this little project, I am thinking I can tackle taking out the outdated intercom system.  I mean really in a ranch style home do you really need those monstrosities? 


Photobucket
Related Posts Plugin for WordPress, Blogger...